Enterprise Edge overview
Plan: Enterprise
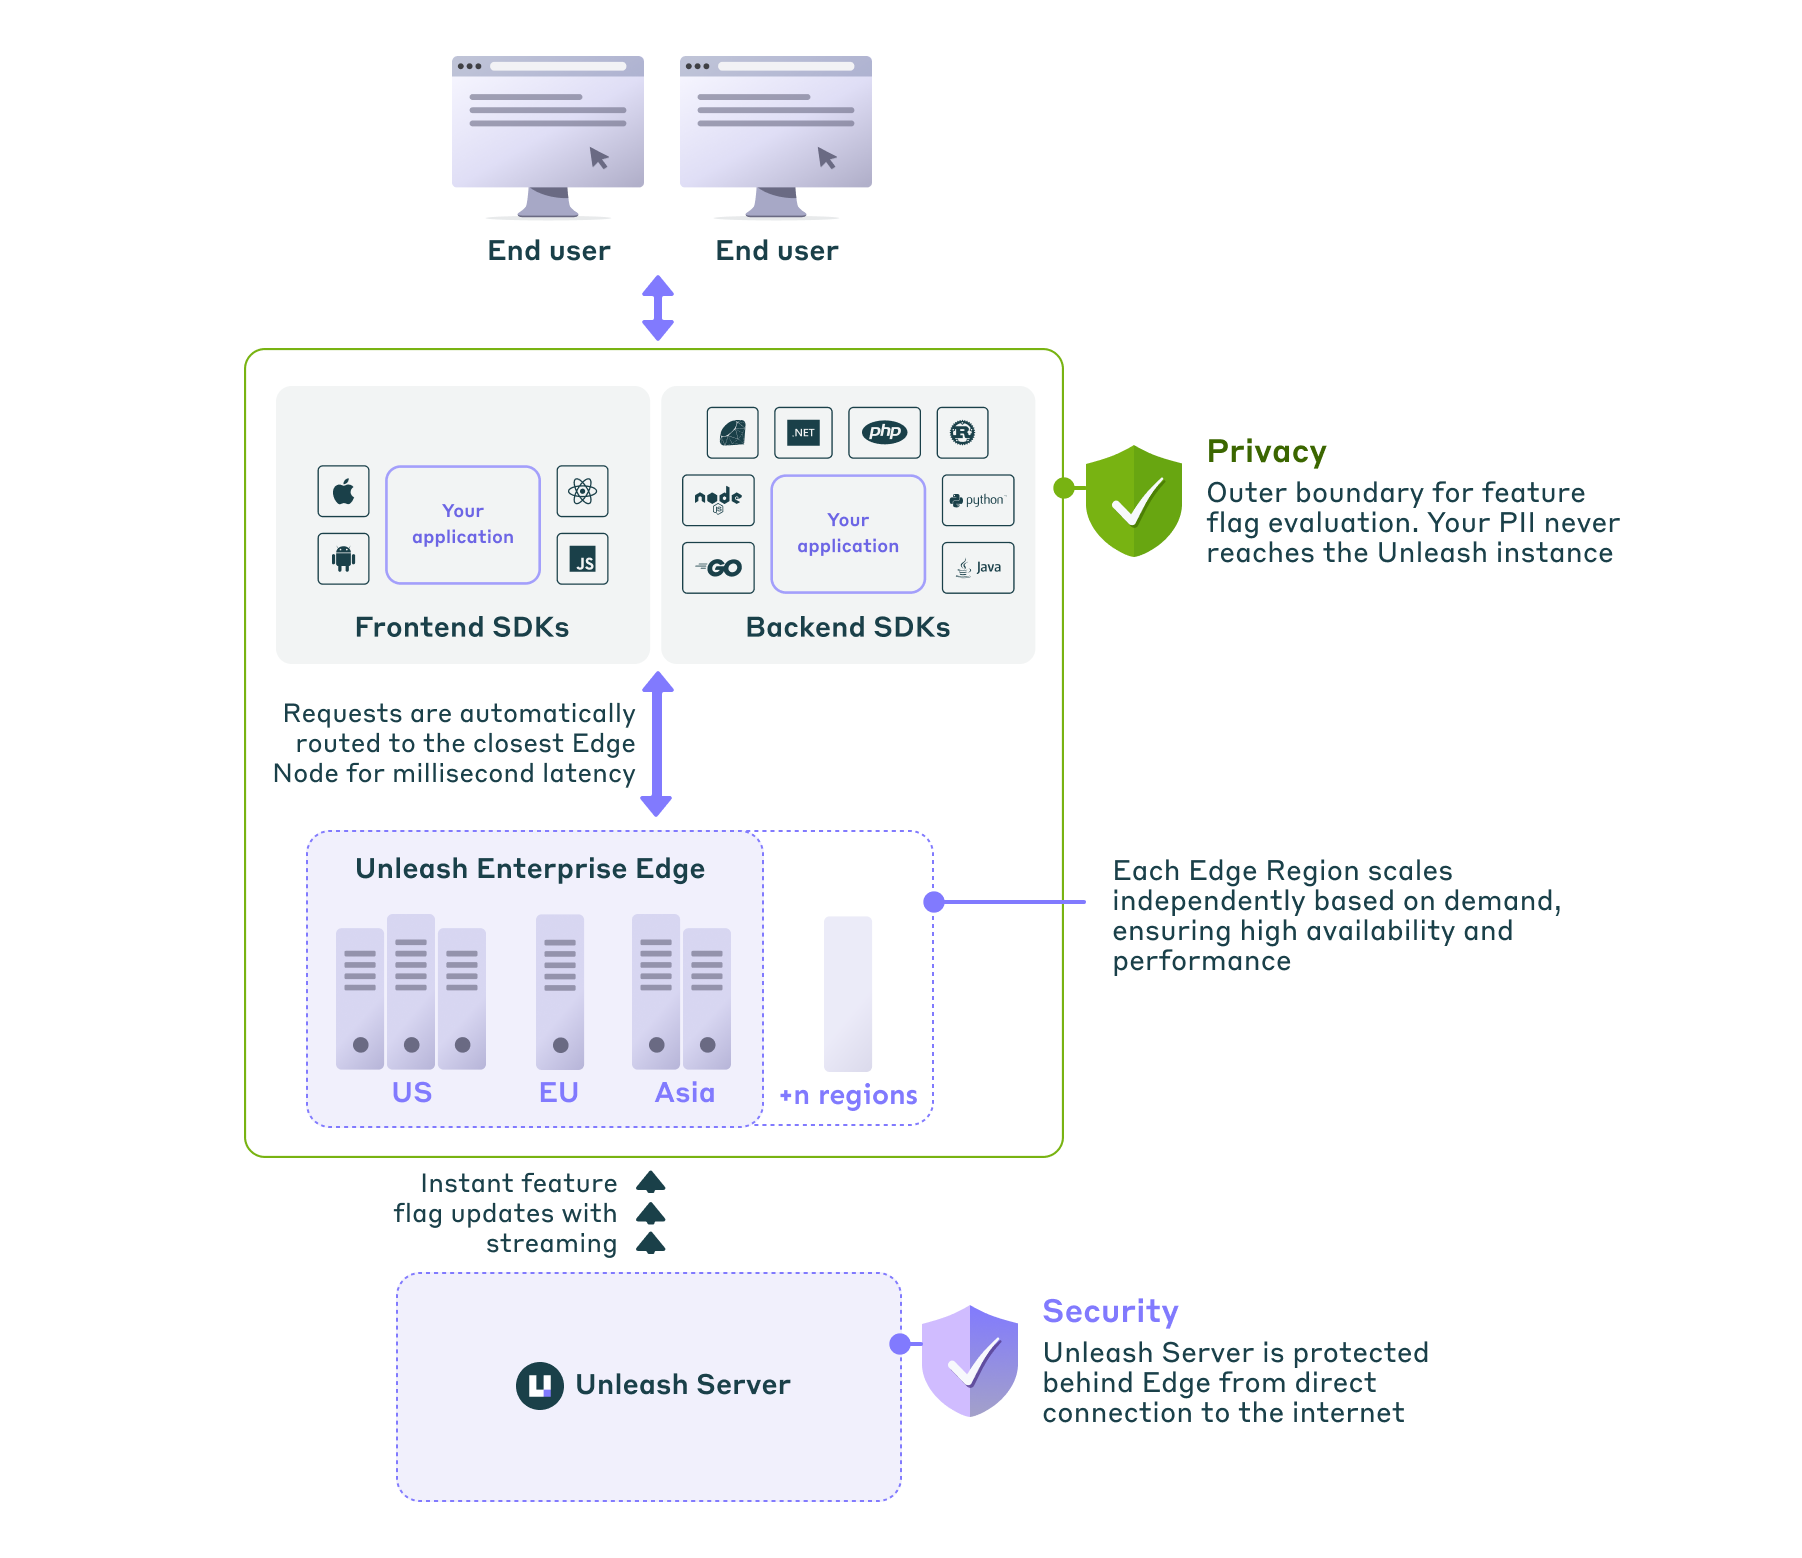
Unleash Enterprise Edge is a lightweight caching layer designed to improve scalability, performance, and resilience. It sits between your application SDKs and the Unleash API, functioning as a read replica that can handle thousands of connected SDKs without increasing the read load on your primary Unleash instance.
Beyond scalability, Unleash Edge offers significant privacy and security benefits. It evaluates feature flags for frontend SDKs directly on the Edge node, ensuring that sensitive user data required for evaluation is never sent upstream to Unleash.
Unleash Edge supports streaming, a persistent connection between Edge and Unleash where configuration changes in Unleash are pushed to Edge nodes immediately, ensuring your feature flags are always up to date without the network overhead of frequent polling.
Edge supports both frontend SDKs and backend SDKs and has multi-environment and project awareness. You can daisy-chain Edge instances to support more complex setups, such as multi-cloud deployments.
Key features:
- Performance: Edge uses in-memory caching and can run close to your end-users. A single instance can handle tens to hundreds of thousands of requests per second. Feature flag configuration updates are propagated to Edge instances instantly through streaming.
- Resilience: Edge is designed to survive restarts and maintain functionality even if you lose connection to your Unleash server.
- Security: Edge supports frontend applications without exposing sensitive data to end-users or to Unleash.
Unleash Edge Enterprise is available as hosted or self-hosted, see Hosting options for a detailed comparison.
How Edge works
Edge sits between your SDKs and Unleash, serving flag data from an in-memory cache with sub-millisecond latency. The cache stays synchronized with Unleash either through periodic polling or real-time streaming.
Edge evaluates feature flags locally. This means user data (PII) used for targeting rules (like user IDs, emails, or IPs) is processed within the Edge node and never sent to the Unleash Cloud or your upstream instance.
Edge also aggregates usage metrics from connected SDKs and sends them upstream to Unleash.

Backend SDKs
Backend SDKs fetch the full feature flag configuration from Edge and evaluate flags locally using activation strategies.
Frontend SDKs
Frontend SDKs send evaluation requests to Edge, which evaluates flags server-side and returns only the results.
Real-time updates with streaming
Enterprise Edge supports streaming mode, which pushes configuration changes from Unleash to Edge with millisecond latency. Enable streaming for near-instant flag updates across your infrastructure.
Enterprise Edge hosted
Enterprise Edge hosted is a fully managed service operated by Unleash. It is ideal for teams requiring globally low latency and high resilience without the added operational overhead.
Enterprise Edge hosted is available in the following data centers:
US:
- us-east-1 (Virginia)
- us-east-2 (Ohio)
- us-west-1 (N. California)
- us-west-2 (Oregon)
Europe:
- eu-central-1 (Frankfurt)
- eu-west-1 (Ireland)
- eu-west-2 (London)
- eu-west-3 (Paris)
- eu-north-1 (Stockholm)
Asia:
- ap-south-1 (Mumbai)
- ap-northeast-3 (Osaka)
- ap-northeast-2 (Seoul)
- ap-northeast-1 (Tokyo)
- ap-southeast-1 (Singapore)
- ap-southeast-2 (Sydney)
Canada:
- ca-central-1 (Central)
South America:
- sa-east-1 (São Paulo)
Enterprise Edge self-hosted
Unleash version: 7.3+
Enterprise Edge self-hosted is hosted and operated by you within your own infrastructure. It is designed for environments requiring strict control, such as air-gapped networks or privacy-sensitive setups.
For more information on how to configure and deploy self-hosted Unleash Edge, go to Deploy Unleash Edge.
How to get Enterprise Edge
To use Enterprise Edge hosted, contact your customer success representative to enable Enterprise Edge in your account. Once Unleash configures Edge in your account, you can update your SDK configuration to use the Edge URL provided.
To use Enterprise Edge self-hosted, you must request a license key from your customer success representative. Self-hosted Edge requires deployment and configuration on your infrastructure.
See:
- Deploy self-hosted Edge for deployment guides.
- Configure self-hosted Edge for configuration reference.
Observability
Plan: Enterprise | Version: 7.4+
Unleash provides deep visibility into the health and performance of your Unleash Edge nodes directly within the Admin UI.

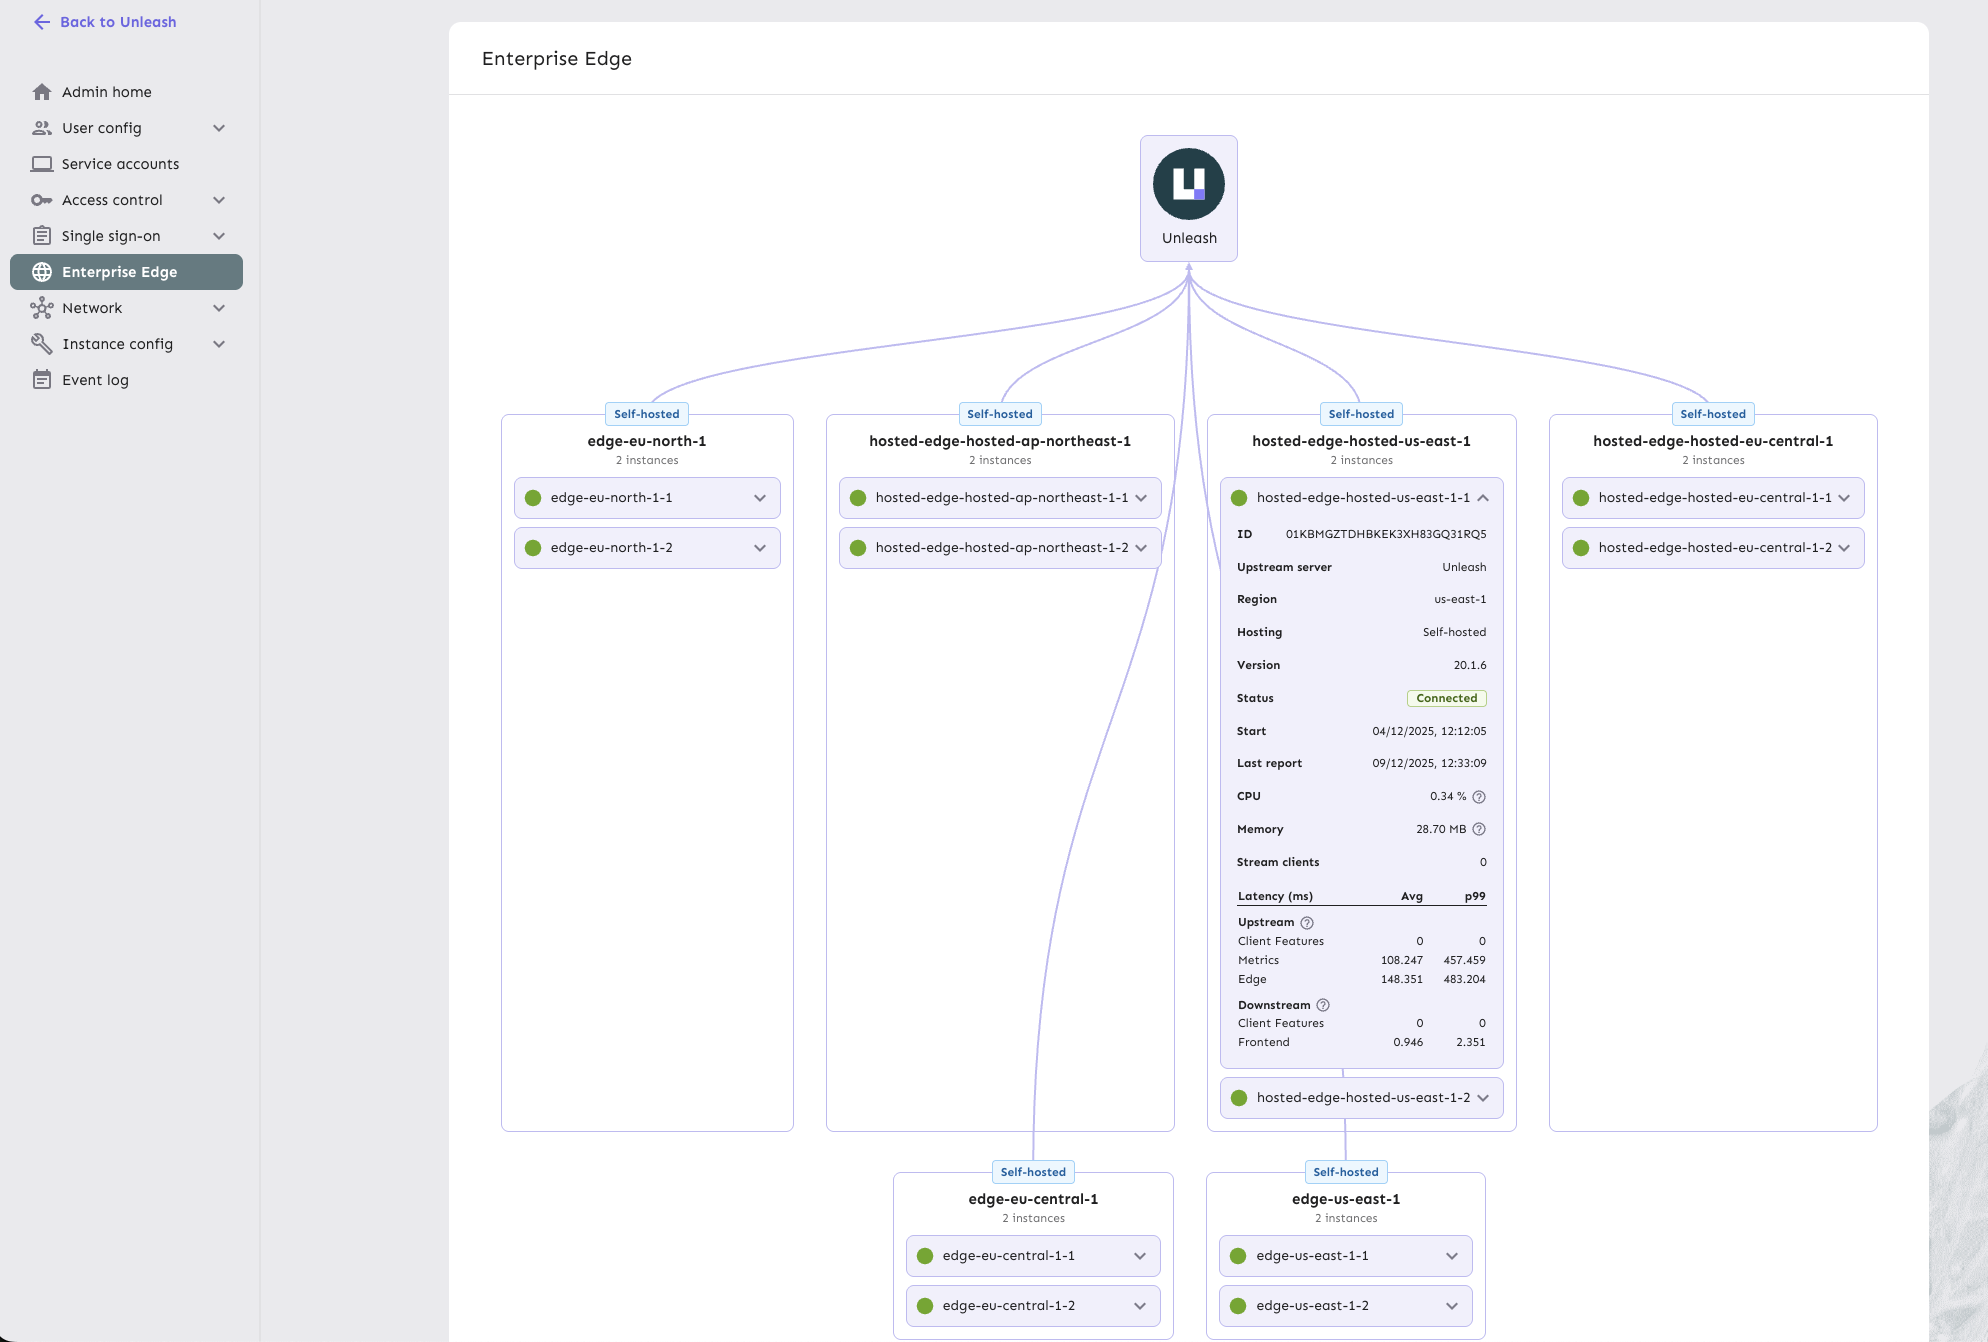
Go to Admin settings > Enterprise Edge to visualize your Edge topology. This view allows you to monitor the real-time state of every connected Edge instance.
The dashboard reports the following metrics for each Edge node:
Instance details: Region, instance ID, upstream server, and hosting type (hosted or self-hosted).
Instance health:
- Hosting type: Hosted or self-hosted.
- Status: Current connection state (such as
Connected). - Version: The running version of the Edge binary.
- Resources: Real-time CPU and Memory usage.
Traffic and performance:
- Stream clients: Number of SDKs currently maintaining a streaming connection.
- Upstream latency: Time taken to fetch updates from the upstream Unleash server (broken down by Client Features, Metrics, and Edge sync).
- Downstream latency: Time taken to serve requests to connected SDKs (broken down by frontend and backend evaluations).
These metrics help you identify bottlenecks, verify regional deployments, and ensure your Edge nodes are properly synced.
Unleash Edge OSS
To better support customers operating at scale, we are shifting our development focus to Enterprise Edge
- Long-Term Support (LTS): The OSS version of Edge is in LTS as of December 12, 2025.
- End-of-life (EOL): The OSS version reaches EOL on December 31, 2026.
We recommend all OSS Edge users migrate to an Enterprise plan with access to Unleash Edge Enterprise.